• Add
  • How do I update my entry in the Berlin Convention Finder?

    How do I update my entry in the Berlin Convention Finder?

    You’ve already created your listing and would now like to update the content? Excellent! Keeping your entry up to date ensures your offers remain appealing to event planners.

    Have you got new photos from a recent photoshoot? Has your address changed? Let us know!

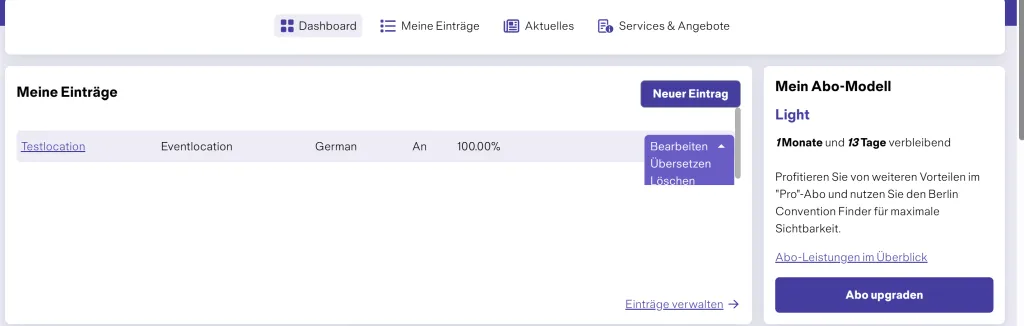
    Navigate to your dashboard where your listings are displayed. To do so, click your username in the top right and then select “My area”.

    You will now see your listings. Click “Edit” to the right of the entry you’d like to update.

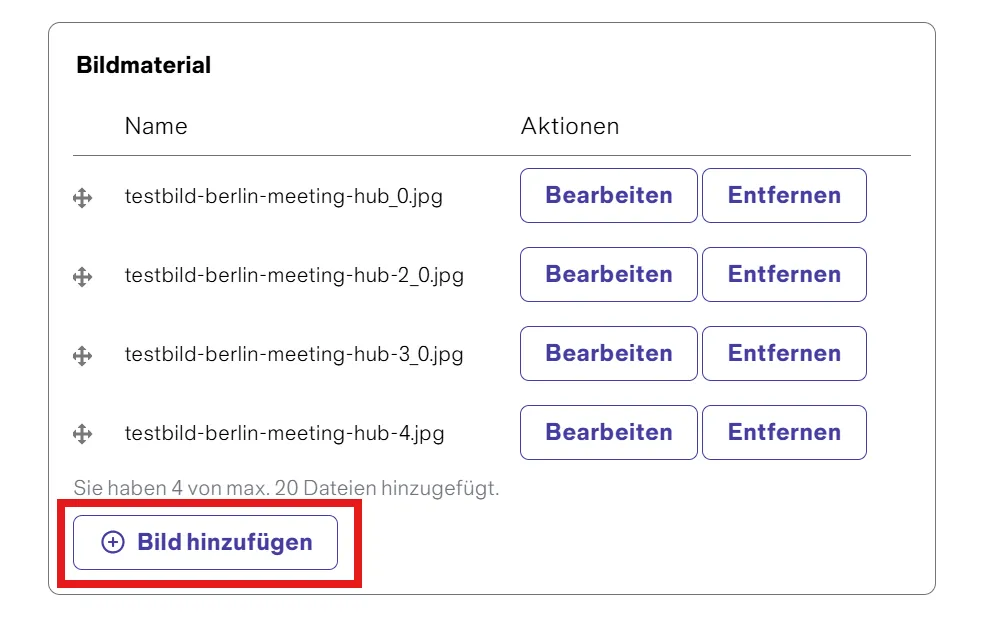
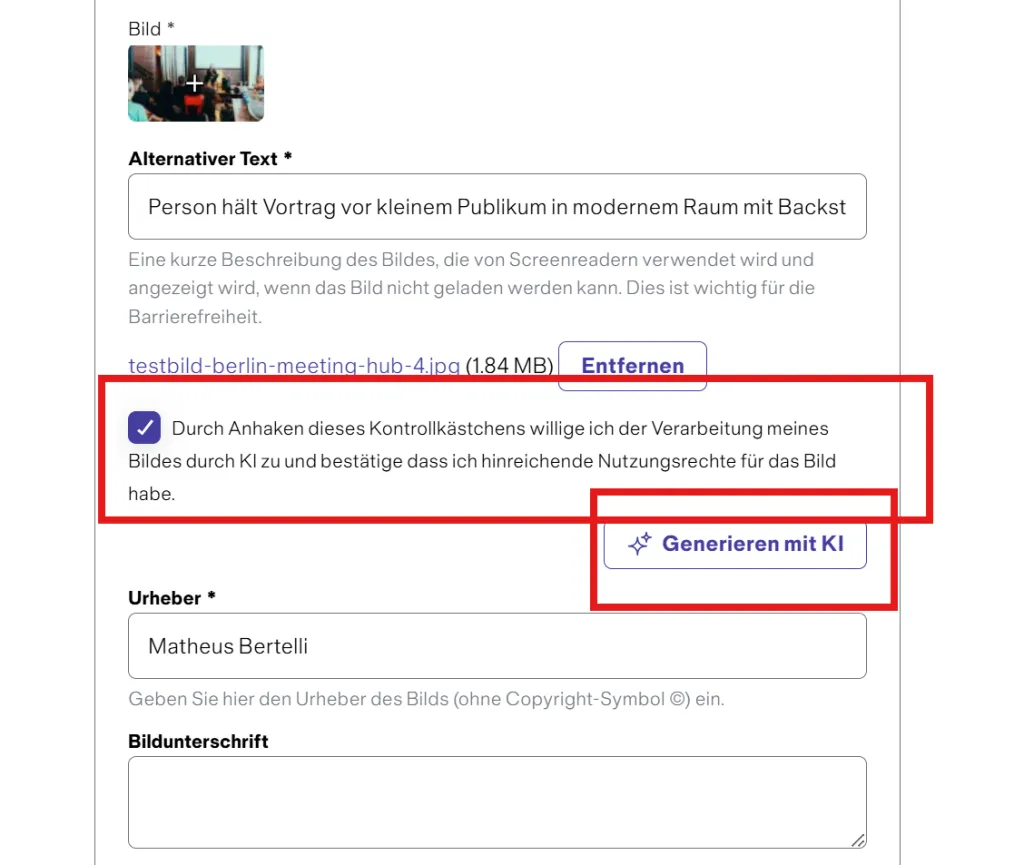
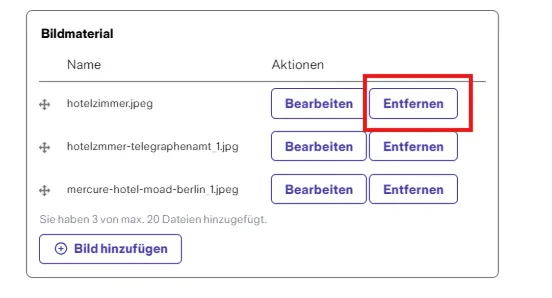
    You will then be guided through four tabs where you can edit your details.

    We recommend clicking “Save changes” at the bottom of the page after each change. This saves your updates as a draft, so nothing is lost and you can pick up where you left off at any time.

    Please note, however, that your changes will remain in draft status and will not be visible online. This means event planners won’t be able to find your listing and the potential of your entry will remain untapped.
    For maximum visibility, we therefore recommend finalising your listing as soon as possible and submitting it for approval.

    Work through each section step by step.

    Status of the subscription model
    Depending on the subscription model you have selected (Light, Basic, Pro), different options are available to you in the Berlin Convention Finder to showcase your offers. You can upgrade your subscription model at any time. An overview of the different models can be found on the “Become a supplier” page.

    Step 1: General information

    Enter your company address and the name of the service you would like to showcase in your listing.

    Step 2: Texts and media

    In this step, you design the content used to present your offering.

    • Search engine optimised texts
      Describe your offering in a way that convinces event planners of your services. We recommend writing your texts in an SEO-optimised way to increase your visibility on Google and make it easier to be found in search results. Please note the character limit permitted by your subscription model. The display below the input field shows how many characters you still have available.
       
    • Short text (Meta Description)
      The short text is a concise summary of your main description and is displayed as the meta description in Google search results. Keep it clear, meaningful and limited to a maximum of 200 characters. Highlight the key features of your offering.
       
    • Sustainability commitment
      Inform event planners about the measures you are implementing in the area of sustainability. Do you completely avoid plastic or use exclusively renewable energy? Great – tell us more!
       
    • Add images
      Add high-resolution images to present your offering in the best possible way. Files of up to 5 MB are permitted in the formats png, gif, jpg, jpeg or webp.
    1. Click on “Add image” in the image section.
    2. Select an image from your computer.
    3. Wait until the image has been uploaded.
    Dateiliste mit fünf Bilddateien und einem Button „Bild hinzufügen“ am Ende.
    • Alternative Text of images
      Please enter a short alternative text. This describes the image for people with a visual impairment.
      You can also use the AI generation feature for this. By clicking on “AI generation”, you confirm that you hold the rights to the image and agree to the use of AI.
      A brief, factual description of the image is sufficient. Imagine you are describing the image to someone who cannot see it. Descriptions such as “meeting room” are insufficient. A better example would be: “Bright meeting room with a large conference table, chairs and natural daylight through floor-to-ceiling windows.”
       
    • Copyright
      Enter the image credit (copyright holder). This information is essential to correctly identify image rights. If you do not provide valid copyright details, we will not be able to publish your listing. To finish, click on the purple “Create image” button. Repeat this step for all additional images you would like to upload.
    Textfeld mit Bestätigungskästchen und hervorgehobener Button "Genehmigung mit KI".
    • How can I delete photos?
      Follow these steps to delete a photo:
    1. Open your listing and switch to the Photo” section.
    2. Click “Entfernen” directly next to the photo you want to delete.
    3. Important: Do not click “Bearbeiten” first and then “Entfernen”. This is a common mistake.
    4. The photo has now been deleted. You can then submit your changes for approval.
       
    • Add video
      In the Basic and Pro models, you have the option to add a video, provided it is available on YouTube or Vimeo. Click on “Add video” and paste the video URL.

      When using YouTube links, please make sure the URL contains the term “watch”, for example:
      https://www.youtube.com/watch?v=mlvhvWPTkwc
       
    • Create a 360-degree tour
    1. Scroll down to the “360-degree tour” section.
    2. Insert the link to your 360-degree tour there.
    3. Under “Preview image” → “Select file”, choose a suitable preview image for the 360-degree tour.
    4. Enter the provider of your 360-degree tour in the “Copyright” field.
    5. Under “Technical provider”, specify the technical service provider for your 360-degree tour.
    6. Then click on “Create 360-degree tour”.

    test

    Step 3: Categories and facilities

    Show what makes your offering special. Select all relevant categories and facilities that apply to your services. This ensures your listing appears more precisely in the filter function and can be found more easily by event planners.

    • Downloads
      Under Downloads, you can provide relevant documents for event planners, such as floor plans, brochures or information sheets.
       
    • Create downloads in the German listing
    1. In your listing, navigate to the “Categories & facilities” tab.
    2. Scroll down to the “Downloads” section.
    3. Click on “Add download”.
    4. Select the desired document via “Select file”. The document will then be uploaded.
    5. Enter a name for the document in the “Description” field.
    6. Click on “Create download”.
    7. Save your changes by clicking on “Save changes” or submit them directly for publication via “Submit changes for approval”.
       
    • Create downloads for the English version
    1. Go to your dashboard and select “Translate” from the drop-down menu next to the listing.
    2. Open the “Texts & Media” tab. Here you will see the German documents that have already been uploaded.
    3. Click on “Edit” to the right of the relevant document.
    4. Then click on “Remove”.
    5. Upload the corresponding English document via “Select file”.
    6. Name the document and confirm by clicking on “Update document”.
    7. Save your changes by clicking on “Save changes” or submit them for approval via “Send changes to review”.

    Step 4: Rooms and capacities

    • Number of participants
      Enter the minimum and maximum number of participants for which your offering should be found in the Berlin Convention Finder. For example, if you only process enquiries from 10 participants upwards, enter “10” as the minimum number of participants.
       
    • Event rooms and spaces
      Enter the square metre figures for your rooms and spaces. This information helps ensure your offering is displayed appropriately in search queries by event planners.
       
    • Create rooms
    1. Scroll to the bottom of the page.
    2. In the “Event rooms” section, click on the “Add room” button.
    3. Enter all available information for the room.
      If you do not have details for certain fields, leave the value at 0.
    4. Once all details have been entered, click on “Create room”.
    5. Repeat this process for each additional room.
    6. Provide as much information as possible so that your capacities are easy for customers to find.

    Step 5: Review details

    Finally, check your entries for completeness and accuracy. Then click on “Send changes for approval”. Your content will be reviewed editorially and only approved and published afterwards.

    Important:
    Please submit your content for approval again after every change. Otherwise, it will remain in draft status and will not be reviewed or published.

    • Save draft
      You can save your changes as a draft at any time and continue editing later. Please note that listings in draft mode are not visible online. This means your listing’s potential remains untapped, as it cannot be found by event planners. We therefore recommend completing your listing promptly and submitting it for approval to achieve maximum visibility.
       
    • Request approval
      Are you happy with your changes? Wonderful! Submit your content for publication by clicking the “Send changes for approval” button. Your listing will be reviewed by our editorial team and published once it has been successfully approved. You will receive an email notification as soon as your listing goes live.

    If your changes are rejected, this is usually due to non-compliance with our quality criteria or incomplete information.
    In this case, please review your content carefully. If you have any questions or require clarification, feel free to contact us at berlinconventionfinder@visitBerlin.de.

    You can find detailed instructions on the approval and publication process on the “Approval & Publication” page.

    Translate your listing

    Don’t forget to make your listing accessible to international event planners as well.
    To translate your listing into English, go back to “Mein Bereich” and click “Bearbeiten” to the right of your listing. A drop-down menu will open, showing the option “Übersetzen”.

    Editing the English version works in exactly the same way as editing the German listing.

    Detailansicht des Übersetzungsbutton im Berlin Convention Finder